How to Crochet Modular Home Organizers: 15 Practical Patterns for Every Room in 2026
Create practical modular crochet organizers for every room with 15 project ideas, material guidance, construction tips, and troubleshooting help.
How to Crochet Modular Home Organizers: 15 Practical Patterns for Every Room in 2026
Last updated: July 2026

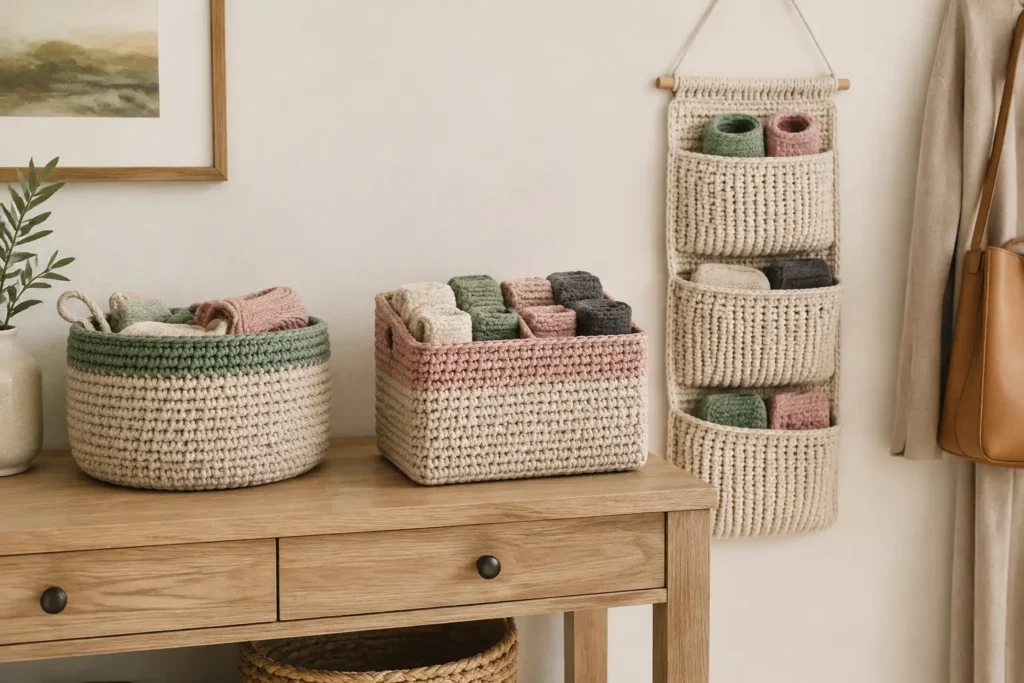
Here’s a truth that every crocheter eventually confronts: we love making things, but sometimes we run out of people to gift scarves and blankets to. Enter crochet modular home organizers — functional, beautiful, customizable storage solutions that you can make for every room in your home.
In 2026, the “crochet for function” movement has exploded. People aren’t just crocheting decorative items anymore; they’re creating practical organizational systems that happen to look stunning. From wall-mounted pocket systems in home offices to hanging bathroom caddies and modular kitchen storage, crocheted organizers are replacing cheap plastic bins and flimsy fabric cubes everywhere.
In this mega-guide, I’ll walk you through 15 organizer patterns covering every room in your home, the techniques that make them structurally sound, and the yarn science that keeps them standing upright and holding their shape for years.
Table of Contents
- Why Crochet Organizers Actually Work
- Structural Techniques Every Organizer Needs
- Yarn Selection for Structural Crochet
- Entryway Organizers (3 Patterns)
- Kitchen Organizers (3 Patterns)
- Bathroom Organizers (2 Patterns)
- Home Office Organizers (3 Patterns)
- Bedroom Organizers (2 Patterns)
- Kids’ Room Organizers (2 Patterns)
- Building a Modular System: Mix and Match
- The Complete Guide to Stiffening Crochet
- Mounting and Installation Methods
- Troubleshooting Common Problems
- FAQ
Why Crochet Organizers Actually Work
I know what you might be thinking: “Won’t crocheted organizers just flop over and look messy?” That’s the misconception that held this concept back for years. But with the right techniques, yarn, and (sometimes) stiffening methods, crochet organizers can be as sturdy as any store-bought alternative — and infinitely more beautiful.
Advantages Over Store-Bought Organizers
- Perfect custom sizing: Your shelf is 11.5 inches wide? No problem. You’re not limited to whatever standard sizes the store carries.
- Color coordination: Match your organizers exactly to your room’s color scheme.
- Modularity: Add more units as your needs change. Remove or rearrange without commitment.
- Sustainability: Natural fiber organizers biodegrade at end of life, unlike plastic bins that sit in landfills for centuries.
- Breathability: Unlike solid bins, crochet allows air circulation — perfect for produce storage, bathroom items, and clothing.
- Softness with structure: They won’t scratch surfaces, dent walls, or shatter when dropped.
- Joy factor: Using something you made with your own hands every single day is a completely different experience from using mass-produced storage.
What’s Changed in 2026
The “functional crochet” movement has matured significantly. Earlier attempts at crocheted organizers often used the wrong yarn (too soft) or wrong techniques (too loose), resulting in floppy, impractical pieces that looked cute on Instagram but didn’t actually work. Today, we have a much better understanding of:
- Which stitch patterns create the stiffest fabric
- How to incorporate internal structure (wire, interfacing, cardboard)
- Which yarns hold their shape under load
- How to properly stiffen finished pieces
Structural Techniques Every Organizer Needs
Before diving into specific patterns, let’s establish the techniques that transform regular crochet into structural, load-bearing fabric.
1. Tight Gauge Crochet
For organizers, you want a much tighter gauge than you’d use for garments or blankets. Use a hook 2-3 sizes smaller than what your yarn label recommends. The fabric should feel firm and barely flexible. If you can see light through it, it’s too loose.
2. Single Crochet Throughout
Single crochet creates the densest, stiffest crochet fabric. While double crochet and taller stitches have their place in garments, organizers should be primarily single crochet (or variations like waistcoat stitch or thermal stitch).
3. Waistcoat Stitch (Knit Stitch)
The waistcoat stitch (inserting your hook between the “V” legs of the stitch rather than under the top loops) creates an incredibly dense, knit-like fabric that’s perfect for organizers. It’s slightly slower than regular single crochet but produces superior structure.
Instead of inserting hook under the top two loops,
insert hook between the front and back vertical "legs" of the V,
yarn over, pull through, yarn over, pull through both loops.
4. Thermal Stitch (Double-Thick Crochet)
This technique creates a double-layered fabric in a single pass. It’s essentially single crochet worked through only the back loop, with the front loops creating a second layer. The result is a thick, insulating, incredibly sturdy fabric.
Row 1: Sc across (foundation row).
Row 2: Working in BLO, sc across.
Row 3 and beyond: Insert hook in BLO of current row AND the unused front loop from 2 rows below. Sc through both.
Thermal stitch uses roughly twice the yarn of regular single crochet but creates organizers that can hold significant weight.
5. Invisible Decrease
When shaping organizer walls or tapering baskets, use the invisible decrease instead of the standard decrease. This prevents holes from forming:
Insert hook under the front loop only of the next 2 stitches (2 loops on hook),
yarn over, pull through both front loops (3 loops on hook),
yarn over, pull through all 3 loops.
6. Working in Continuous Rounds (Spiral)
Most basket-style organizers are worked in continuous spiral rounds rather than joined rounds. This eliminates the visible seam line and creates a smoother finish. Use a stitch marker to track the beginning of each round.
7. Internal Support Structures
For taller organizers (over 6 inches), consider incorporating internal support:
- Plastic canvas: Cut to shape and crocheted around or inserted between layers.
- Wire: Thin craft wire can be crocheted over along the top rim to prevent flopping.
- Cardboard with fabric backing: For flat bases, slide a fabric-covered piece of cardboard into a double-layer bottom.
- Dowel rods: For wall-mounted organizers, a wooden dowel threaded through crochet loops provides a rigid hanging point.
Yarn Selection for Structural Crochet
This is arguably the most important section of this entire post. Yarn choice determines 80% of whether your organizer will stand up or flop over.
The Best Yarns for Organizers
🥇 #1: Cotton Rope / Macrame Cord (3mm-5mm)
This is the gold standard for crochet baskets and organizers. Single-strand braided cotton cord creates incredibly sturdy, beautiful organizers with a modern aesthetic. It’s what you see in all those gorgeous minimalist crochet basket photos.
- Pros: Extremely sturdy, holds shape without stiffening, beautiful woven texture, washable
- Cons: Hard on hands for extended crocheting (take breaks!), limited color range, heavy
- Best for: Large baskets, floor-standing organizers, heavy-duty storage
- Recommended hook: 6mm-9mm depending on cord thickness
🥈 #2: T-Shirt Yarn / Zpagetti
Made from recycled jersey fabric strips, t-shirt yarn creates chunky, sturdy baskets quickly. It’s sustainable, widely available, and comes in great colors.
- Pros: Fast to work, very sturdy, eco-friendly, soft texture
- Cons: Inconsistent width (can affect gauge), bulky finished products, can stretch over time
- Best for: Medium baskets, bedroom organizers, kids’ room storage
- Recommended hook: 8mm-12mm
🥉 #3: Worsted Weight Cotton (Doubled)
If cotton rope is too aggressive for your hands, try holding two strands of worsted weight cotton together with a tight gauge. This creates a dense, manageable fabric.
- Pros: Comfortable to work with, huge color range, widely available, affordable
- Cons: Less structural than cord/rope, may need stiffening for taller pieces
- Best for: Wall organizers, small desk organizers, drawer dividers
- Recommended hook: 4.5mm-5.5mm (tight gauge)
Honorable Mentions
- Jute twine: Natural, rustic look. Very stiff and structural. Can be rough on hands — wear a finger guard. Great for plant hangers, kitchen organizers.
- Polypropylene cord: Waterproof, mildew-resistant, holds shape forever. Perfect for bathroom organizers. Not eco-friendly but incredibly functional.
- Raffia: Natural palm fiber that creates gorgeous, structured baskets with an organic look. Excellent for entryway and living room pieces.
Yarns to AVOID for Organizers
- Acrylic (regular): Too stretchy, won’t hold shape under weight
- Wool: Will felt if it gets wet, too elastic for structure
- Bamboo: Beautiful but too drapey — the opposite of what organizers need
- Chenille: Zero structural integrity
- Any “super soft” yarn: If it’s marketed for its softness, it’s wrong for this project
Entryway Organizers
Pattern 1: The Wall-Mounted Mail & Key Pocket System
This is a flat panel with 3-4 pockets of varying sizes, mounted on a wooden dowel and hung by the front door. It holds mail, keys, sunglasses, and dog leashes.
Dimensions
- Backing panel: 18″ wide × 24″ tall
- Large pocket (mail): 18″ wide × 8″ tall
- Medium pockets (2): 8.5″ wide × 5″ tall
- Small pocket (keys): 5″ wide × 4″ tall
Construction
- Back panel: Using worsted weight cotton (doubled) and a 5mm hook, chain the width and work in single crochet until you reach the full height. Work in rows, turning at the end of each row.
- Pockets: Make each pocket as a separate rectangle. The pocket height listed above is the folded height — crochet each piece twice as tall, then fold the bottom up and seam the sides to create a pocket with a finished top edge.
- Assembly: Sew or slip stitch each pocket onto the backing panel at the desired position. Leave the top of each pocket open.
- Dowel channel: At the top of the backing panel, fold over 1.5 inches and stitch across, creating a channel. Thread a wooden dowel through the channel.
- Hanging: Tie cord or leather strips to each end of the dowel for hanging.
Customization Ideas
- Add a crocheted loop at the bottom of a pocket for hanging keys
- Use a contrast color for pocket borders
- Embroider labels onto each pocket (“MAIL,” “KEYS,” etc.)
- Add a row of small brass hooks screwed into the dowel for hanging items
Pattern 2: The Catch-All Entry Basket
A sturdy, medium-sized basket that sits on a console table or shelf. This is where you dump your wallet, phone, loose change, and everything from your pockets when you walk in the door.
Dimensions
- Base: 10″ × 6″ (rectangular)
- Height: 4″
Construction
- Base: Using 3mm cotton rope and an 8mm hook, chain to the desired length (6″). Work in single crochet for 10″ width. This is worked as an oval/rectangle in continuous rounds:
- Round 1: Chain desired length, sc around both sides of the chain with 3 sc in each end stitch to turn the corners.
- Rounds 2-6 (approximately): Continue around, increasing at the corners until the base reaches 10″ × 6″.
- Walls: Stop increasing. Work one round in BLO (back loop only) — this creates the sharp “bend” between the base and the walls. Then continue in regular single crochet (through both loops) for approximately 4″ of height.
- Rim: Finish with a round of crab stitch (reverse single crochet) for a decorative, rolled edge that also adds rigidity.
Pro Tip
For an extra-stiff base, cut a piece of cardboard to fit inside the bottom and cover it with fabric before placing it inside the basket. This prevents the base from becoming rounded on the bottom.
Pattern 3: The Shoe Cubby Stackable Bins
A set of 3-4 open-front bins sized for shoes, designed to stack or sit side by side on a shoe rack.
Dimensions (per bin)
- Width: 7″
- Depth: 13″ (to fit a shoe lengthwise)
- Height: 6″ at back, 3″ at front (angled front for easy access)
Construction
- Base: Work a 7″ × 13″ rectangle in single crochet using t-shirt yarn and a 10mm hook.
- Back wall: Along one 7″ edge, work straight up for 6″.
- Side walls: Along each 13″ edge, work tapered walls — start at 6″ high (where they meet the back wall) and decrease to 3″ high at the front. Decrease by working fewer rows at the front edge.
- Front wall: Along the remaining 7″ edge, work straight up for 3″.
- Assembly: If worked in separate pieces, seam together. For a more seamless look, pick up stitches along each edge and work walls directly from the base.
Stacking
Make each bin with a slightly flared top edge (increase by 1 stitch on each side in the last 2 rows). This creates a lip that prevents bins from sliding off each other when stacked.
Kitchen Organizers
Pattern 4: The Hanging Produce Hammock (3-Tier)
This is one of the most practical and visually stunning organizers you can crochet. Three mesh “hammocks” hang vertically, connected by crocheted straps, holding fruit and vegetables while allowing air circulation to prevent premature ripening.
Materials
- Cotton rope (3mm) or jute twine
- 6mm hook
- 3 metal or wooden rings (3″ diameter) for the top
- A ceiling hook
Construction
- Hammock tiers (make 3): Work a circle base of approximately 10″ diameter in single crochet. Then switch to a mesh pattern (dc, ch 2, skip 2) and continue for 4-5 rounds, letting the mesh flare outward. The solid center holds the produce; the mesh sides allow air flow.
- Connecting straps (make 3 sets of 3): Chain 30 (or desired length between tiers). Each tier needs 3 straps spaced evenly around the circumference, connecting it to the tier above.
- Top ring assembly: Join all three top straps through a metal ring. Crochet a hanger chain from the ring to a hook.
How It Works
Hang from the ceiling near your kitchen counter. Place heavy items (potatoes, onions) in the bottom tier, medium items (apples, oranges) in the middle, and light/delicate items (bananas, tomatoes) on top. The air circulation through the mesh extends produce life significantly compared to closed bowls.
Pattern 5: The Utensil Caddy
A cylindrical holder with internal dividers for spatulas, wooden spoons, whisks, and other kitchen tools. Sits next to your stove.
Dimensions
- Outer cylinder: 6″ diameter × 7″ tall
- Inner dividers: Create 3-4 sections
Construction
- Outer cylinder: Using cotton rope and an 8mm hook, work a 6″ diameter circle base (same technique as the catch-all basket). Then work walls straight up for 7″.
- Inner dividers: Crochet 2 rectangular panels, each 6″ wide × 7″ tall. Cross them in the center (creating a + shape when viewed from above) and stitch them together where they intersect. Insert this cross-shaped divider into the cylinder and stitch it to the walls.
- Rim: Crochet over a piece of craft wire along the top edge to ensure the rim stays perfectly round and rigid.
Important Note
If this will sit near your stove, use 100% cotton — it’s naturally fire-resistant. Never use acrylic or synthetic yarn near heat sources, as they can melt.
Pattern 6: Drawer Divider Strips
Flexible yet sturdy divider strips that fit inside kitchen drawers to separate utensils, gadgets, or spices.
Construction
These are brilliantly simple:
- Measure your drawer height (typically 3-4 inches).
- Using doubled worsted cotton and a 4mm hook, crochet a strip that’s as tall as the drawer and as long as the drawer is wide.
- Fold the strip in half lengthwise (creating a double-thick wall) and slip stitch the edges together.
- The strip stands upright inside the drawer, dividing sections. Make as many as you need.
Pro Tip
Insert a strip of plastic canvas inside before seaming closed. This makes the dividers completely rigid and prevents them from bowing under the weight of utensils.
Bathroom Organizers
Pattern 7: The Shower Caddy (Hanging)
A multi-pocket organizer that hangs from your showerhead or a suction hook, holding shampoo bottles, soap, razors, and loofahs.
Key Design Considerations
- Yarn choice: Use polypropylene cord or 100% cotton (cotton will need periodic washing to prevent mildew; polypropylene won’t).
- Drainage: Incorporate mesh sections or drainage holes at the bottom of each pocket so water doesn’t pool.
- Weight capacity: A full shampoo bottle weighs about 1 pound. Your caddy needs to hold 3-5 pounds total.
Construction
- Backing panel: 8″ wide × 20″ tall, worked in tight single crochet.
- Large pocket (bottles): 8″ wide × 6″ tall, with mesh bottom for drainage. The pocket needs to be 3-4″ deep (sides are worked as part of the pocket).
- Medium pocket (soap/razor): 8″ wide × 4″ tall, solid construction.
- Small pockets (2 side by side): 3.5″ wide × 3″ tall each, for smaller items.
- Hanging loop: A reinforced loop at the top, worked with double thickness, that slips over a showerhead arm or hook.
Drainage Detail
For the large pocket bottom, switch to a mesh pattern: *sc, ch 1, skip 1* across. This creates small holes that let water drain while keeping bottles from falling through.
Pattern 8: The Vanity Organizer Set
A matching set of 3 containers for your bathroom counter: a small cup (toothbrushes), a medium cylinder (cotton balls/Q-tips), and a small tray (jewelry/hair ties).
Dimensions
- Toothbrush cup: 3″ diameter × 5″ tall
- Cotton ball container: 4″ diameter × 4″ tall (with lid)
- Tray: 6″ × 4″ × 1.5″ tall
Construction Notes
- Work all pieces in the same yarn and color for a cohesive look.
- The toothbrush cup should have a slightly weighted base — crochet a double-thick bottom or insert a small river stone before closing the base.
- The cotton ball container lid is worked as a flat circle with a small knob handle on top (a stuffed crochet ball or a wooden bead sewn on).
- The tray is simply a flat rectangle with very short walls (1.5″), worked the same as the catch-all basket but shallower.
Home Office Organizers
Pattern 9: The Desk Caddy with Pen Cups
A rectangular tray base with 3 attached cylindrical cups of different heights for pens, scissors, and markers, plus an open section for sticky notes and a phone stand.
Dimensions
- Base tray: 10″ × 5″ × 1″ tall
- Tall cup (pens): 2.5″ diameter × 5″ tall
- Medium cup (scissors): 3″ diameter × 4″ tall
- Short cup (markers/clips): 3″ diameter × 2.5″ tall
Construction
- Crochet the base tray first (flat rectangle with short walls).
- Crochet each cup separately as cylinders, stiffened with fabric stiffener (see stiffening section below).
- Sew or hot-glue cups onto the tray base. For a fully crocheted join, work a round of single crochet connecting the cup base to the tray.
Phone Stand Integration
On one end of the tray, crochet a small angled wedge (like a doorstop shape) that props up your phone at a comfortable viewing angle. Work a right triangle in single crochet, stuff it lightly with polyfill, and attach it to the tray.
Pattern 10: The Cable Management Basket
A long, narrow basket designed to sit behind your desk or entertainment center, corralling power strips, excess cable length, and chargers.
Dimensions
- Length: 18-24″ (customize to your space)
- Width: 5″
- Height: 4″
Key Feature
Instead of solid walls on the long sides, incorporate notched openings every 4 inches along the top edge. These U-shaped notches (about 1″ wide × 1.5″ deep) allow cables to exit the basket neatly without having to drape over the top.
Construction
- Work the base as a long rectangle.
- Work walls straight up, but on the long sides, stop at each notch position, chain across the notch width, and continue. On the next row, work stitches into the chain to bridge the gap and continue the wall.
- Use cotton rope for this one — it needs to hold the weight of a power strip.
Pattern 11: The Wall-Mounted Document Organizer
A vertical system with 3-5 flat pockets designed to hold files, notebooks, tablets, or papers. Mounted on a wall near your desk.
Dimensions
- Each pocket: 10″ wide × 3″ deep × 12″ tall (front face)
- Pockets stack vertically with 1″ gaps between them
Construction
- Back panel: A long strip, 10″ wide × total height of all pockets combined. Worked in stiff single crochet.
- Pockets: Each pocket is a rectangle folded into a box shape — bottom, front face, and two small side panels. The back is left open and attached directly to the backing panel.
- Reinforcement: Insert plastic canvas into the pocket bottoms so they don’t sag under the weight of papers.
- Labels: Crochet small tabs on the front of each pocket in a contrasting color. Use fabric markers to write labels on each tab.
Bedroom Organizers
Pattern 12: The Bedside Caddy
This organizer tucks between your mattress and bed frame, with pockets that hang down the side of the bed, holding your phone, book, glasses, remote, and earbuds.
Dimensions
- Flap (tucks under mattress): 18″ × 8″
- Hanging section: 18″ wide × 14″ tall
- Pockets: Various sizes arranged across the hanging section
Construction
- Main panel: One continuous piece, 18″ wide × 22″ tall (8″ tucks under the mattress, 14″ hangs down). Use worsted weight cotton (doubled) for rigidity.
- Pockets layout (customize to your needs):
- One tall narrow pocket (phone): 4″ wide × 7″ tall
- One wide shallow pocket (book/tablet): 10″ wide × 8″ tall
- One small square pocket (glasses): 4″ wide × 4″ tall
- One tiny pocket (earbuds): 3″ wide × 3″ tall
- Sew pockets onto the hanging section of the main panel.
Design Tip
Weight the bottom edge of the main panel with a row of very tight stitches or by crocheting over a small metal chain. This prevents the caddy from bunching up when you put items in the pockets.
Pattern 13: The Closet Door Accessory Organizer
Hangs over a closet door (or on a hook inside the closet) with pockets sized for scarves, belts, sunglasses, hats, and jewelry.
Dimensions
- Full panel: 14″ wide × 48″ tall
- Over-door flap: 14″ × 5″ (folds over the top of the door to keep the organizer in place)
Construction
- Crochet the full panel as one long piece.
- Create 6-8 pockets of varying sizes, arranged vertically.
- The top 5″ folds over the door — reinforce this section with plastic canvas so it holds its shape over the door edge.
- Consider adding small crocheted loops along the sides for hanging additional items on hooks.
Kids’ Room Organizers
Pattern 14: The Toy Sorting Baskets (Color-Coded Set)
A set of 4-6 large, soft, color-coded baskets for toy sorting. Each basket is a different color so kids can learn to sort: blocks in the blue basket, stuffed animals in the pink basket, cars in the green basket, etc.
Dimensions (per basket)
- Base: 10″ diameter circle
- Height: 8″
Construction
Use t-shirt yarn and a 12mm hook for maximum speed and maximum sturdiness.
- Work a circle base of 10″ diameter.
- Work one round in BLO to create the base-to-wall transition.
- Work walls straight up for 8″.
- Add handles: At 2 opposite points on the last round, chain 8-10, skip 8-10 stitches, and continue. On the next round, work single crochet into the chain to reinforce the handle. Work 2 more rounds of sc over the handle for thickness.
Kid-Friendly Features
- Soft material (t-shirt yarn) means these won’t hurt if thrown or knocked over
- No rigid components — safe for young children
- Machine washable (gentle cycle, air dry)
- Add a simple crocheted appliqué or embroidered icon on each basket to help pre-readers identify which toys go where
Pattern 15: The Wall-Mounted Book Sling
A forward-facing book display that mounts to the wall, showing book covers rather than spines. Perfect for kids’ rooms and reading nooks. Each sling holds 4-6 books with covers facing outward.
Dimensions (per sling tier)
- Width: 24″
- Depth (how far the sling hangs from the wall): 5″
- Height of fabric: 6″
Construction
- Fabric panel: Crochet a rectangle 24″ wide × 6″ tall in tight single crochet using doubled worsted cotton.
- Dowel channels: At the top and bottom of the rectangle, fold over 1″ and stitch to create channels.
- Dowels: Insert wooden dowels (24″ long, 3/8″ diameter) into both channels.
- Mounting: Mount the top dowel flush against the wall with brackets. The bottom dowel hangs 5″ forward from the wall (use string, rope, or crocheted straps from the top dowel to the ends of the bottom dowel to set the depth).
- How it works: Books sit in the “hammock” created between the two dowels, with their covers visible above the front dowel.
Make 3-4 sling tiers and mount them vertically for a full book display wall.
Building a Modular System: Mix and Match
The real power of crocheted organizers comes from treating them as a system rather than individual items. Here’s how to create a cohesive, modular organizational setup:
Choose a Color Palette
Pick 2-3 colors that work across your entire home. For example:
- Primary color: Natural/cream (60% of your organizers)
- Secondary color: Charcoal gray (30% of your organizers)
- Accent color: Terracotta or sage (10% — for special pieces)
Standardize Your Sizing
Create a personal “unit” size based on your shelving. If your shelves are 12″ cubes, make baskets that fit inside them precisely. Measure once, then make multiple baskets to the same dimensions.
Consistent Stitch Pattern
Pick one stitch (regular sc, waistcoat stitch, or thermal stitch) and use it for ALL organizers throughout your home. This creates visual continuity even when shapes and sizes differ.
Label Everything
For true organizational efficiency, add labels to your crocheted organizers. Options include:
- Crocheted letter appliqués
- Embroidered labels using yarn and a tapestry needle
- Small chalkboard tags (purchased) attached with crocheted loops
- Leather labels stamped or burned with text
The Complete Guide to Stiffening Crochet
Not every organizer needs stiffening — cotton rope baskets are naturally rigid. But for organizers made with regular yarn, stiffening can transform a floppy piece into a structured one.
Method 1: Liquid Starch
- Best for: Light stiffening, items that might need washing later (starch washes out)
- How to: Submerge the finished piece in liquid starch, squeeze out excess, shape over a form (bowl, box, etc.), and let dry completely (24-48 hours).
- Durability: Moderate. Will soften in humidity or if splashed with water.
Method 2: White Glue (PVA) Solution
- Best for: Medium stiffening, items that won’t get wet
- How to: Mix equal parts white glue and water. Submerge the piece, squeeze out excess, shape and dry.
- Durability: Good. Holds shape well but can become tacky in high humidity.
Method 3: Fabric Stiffener (Commercial)
- Best for: Strong stiffening, permanent results
- How to: Products like Aleene’s Fabric Stiffener or Mod Podge Stiffy. Apply according to package directions.
- Durability: Excellent. Permanent stiffening that withstands normal use.
Method 4: Sugar Water
- Best for: Natural, food-safe stiffening (good for kitchen items)
- How to: Dissolve 1 cup sugar in 1/2 cup boiling water. Let cool. Submerge the piece, shape, and dry.
- Durability: Moderate. Can attract insects if used outdoors. Washes out with water.
Method 5: Internal Structure (No Chemical Stiffening)
- Best for: Items that need to be washed, items around food or children
- How to: Insert plastic canvas, cardboard (covered in contact paper for water resistance), or wire into the crocheted piece.
- Durability: Excellent. The structure is mechanical rather than chemical.
Stiffening Tips
- Always shape the item while wet. Once dry, stiffened crochet is very difficult to reshape.
- Use forms: Plastic bowls, boxes, jars, and cans make excellent forms. Cover them with plastic wrap so the crochet doesn’t stick.
- Multiple coats: For maximum rigidity, apply 2-3 coats, drying completely between each.
- Test first: Stiffen a swatch before committing to the whole piece. Different yarns absorb stiffener differently.
Mounting and Installation Methods
For wall-mounted organizers, proper installation is critical for both aesthetics and function.
Dowel and Bracket Method
Thread a wooden dowel through a crocheted channel at the top of the organizer. Mount the dowel to the wall using decorative brackets or leather straps screwed into the wall. This distributes weight evenly and looks beautiful.
Command Strip Method (Lightweight Items)
For organizers holding lightweight items (keys, sunglasses, small accessories), adhesive Command strips work well. Apply strips to a flat section of the crocheted back panel. Weight limit: typically 3-5 pounds depending on the strips.
Grommets and Hooks
Install metal grommets into the crocheted fabric at hanging points, then hang on wall hooks or nails. Grommets prevent the yarn from stretching under the weight. You can buy grommet kits at any craft store.
Tension Rod Method
For organizers that span a small space (inside a closet, between two walls), thread a tension rod through a crocheted channel. The rod pressure-mounts between the walls with no hardware needed.
Suction Cup Method (Bathrooms)
For shower and bathroom organizers on tile, use heavy-duty suction cups rated for the weight you need. Thread the suction cup hooks through crocheted loops at the top of the organizer.
Troubleshooting Common Problems
“My basket won’t stand up straight”
Causes: Hook too large, yarn too soft, gauge too loose.
Solutions: Go down 2-3 hook sizes. Switch to cotton rope or add internal structure. Stiffen the finished piece.
“The base is rounded and the basket rocks”
Causes: Too many increases in the base, or the BLO transition round is pulling upward.
Solutions: Use fewer increase rounds. Insert a flat piece of cardboard or plastic canvas in the base. Block the base flat while wet.
“My organizer is stretching out from the weight of items”
Causes: Wrong yarn choice (too stretchy) or gauge is too loose.
Solutions: Use cotton rope or doubled cotton yarn. Work at a tighter gauge. Add structural support at stress points (wire in the rim, reinforced handles).
“The colors are bleeding/fading”
Causes: Yarn dye isn’t colorfast.
Solutions: Before starting, test colorfastness by wetting a piece of the yarn and pressing it against a white paper towel. If color transfers, pre-wash the finished item in cold water with a color fixative (vinegar or salt) before stiffening.
“My pockets won’t stay open”
Causes: Pocket walls are too floppy to hold their shape.
Solutions: Crochet over wire along the pocket opening. Stiffen just the pocket area. Use a stiffer yarn for pockets even if the backing panel is softer.
“Seaming looks messy”
Causes: Wrong seaming technique or mismatched stitch counts.
Solutions: Use mattress stitch for invisible seams. Count stitches carefully so pieces are the same length where they join. Use a yarn needle and matching yarn rather than the crochet hook for seaming.
Frequently Asked Questions
Can I machine wash crocheted organizers?
Cotton and t-shirt yarn organizers can typically handle a gentle machine cycle in cold water. However, if you’ve stiffened them with starch, glue, or fabric stiffener, machine washing will remove the stiffening. Organizers with internal plastic canvas or cardboard should be spot-cleaned only.
How much yarn do I need for a typical basket?
A medium basket (8″ diameter × 6″ tall) in cotton rope uses approximately 150-200 yards of 3mm cord. In worsted weight cotton (doubled), expect to use 250-350 yards. Always buy more than you think you need — running out of yarn mid-project and dealing with dye lot differences is frustrating.
Are crocheted organizers safe for food storage?
Cotton and jute organizers are food-safe for dry goods, produce, and bread. Don’t store wet or oily foods directly in crocheted containers (use a liner). If you’ve used chemical stiffeners, don’t let food contact the stiffened surface.
Can kids help make these?
Absolutely! The basic basket pattern (circle base → straight walls) is one of the best beginner projects for kids learning to crochet. Use t-shirt yarn and a large hook (10mm-12mm) for little hands. The big, quick stitches provide instant gratification.
How long do crocheted organizers last?
With proper yarn choice and care, crocheted organizers last for years. Cotton rope baskets in particular are remarkably durable — many crocheters report using the same baskets for 5+ years with no signs of wear. The key is using the right materials from the start.
What if I can’t crochet tightly enough for organizers?
Some people naturally crochet loosely, and that’s perfectly fine for most projects. For organizers, try these tricks: drop down 3-4 hook sizes instead of just 1-2; use the waistcoat stitch instead of regular sc (it’s naturally tighter); or embrace the stiffening methods outlined above to compensate.
Can I sell crocheted organizers?
Yes! Crocheted home organizers are actually one of the best-selling handmade categories right now. They photograph beautifully, they’re practical (people are more willing to pay for functional items than decorative ones), and each one is unique. Etsy, local craft fairs, and Instagram shops are all great platforms.
Final Thoughts
Crocheting organizers has completely changed how I think about both my craft and my home. Every time I reach for my phone in my bedside caddy, grab a pen from my desk caddy, or sort toys into color-coded baskets with my kids, I’m interacting with something I made with my own hands. It’s a small but constant source of satisfaction that store-bought plastic bins could never provide.
Start with one organizer — I recommend the catch-all entry basket or the desk caddy — and see how it feels to use a functional crocheted item every day. I bet you’ll be hooked (pun absolutely intended) and planning your next three organizer projects before the first one is even finished.
The beauty of the modular approach is that you can build your system gradually. One basket this weekend. A wall organizer next month. A full set of closet organizers over the summer. Before you know it, you’ll have a beautifully organized home that’s also a showcase of your crochet skills.
Happy organizing, happy hooking! 🧶
Which room in your home needs the most organizational help? Tell me in the comments and I’ll help you figure out which pattern to start with!