Crochet Mesh Layering: The 2026 Fashion Trend You Can Make at Home
Learn how to crochet and style modern mesh layering pieces with yarn guidance, essential stitches, project ideas, and practical care tips.
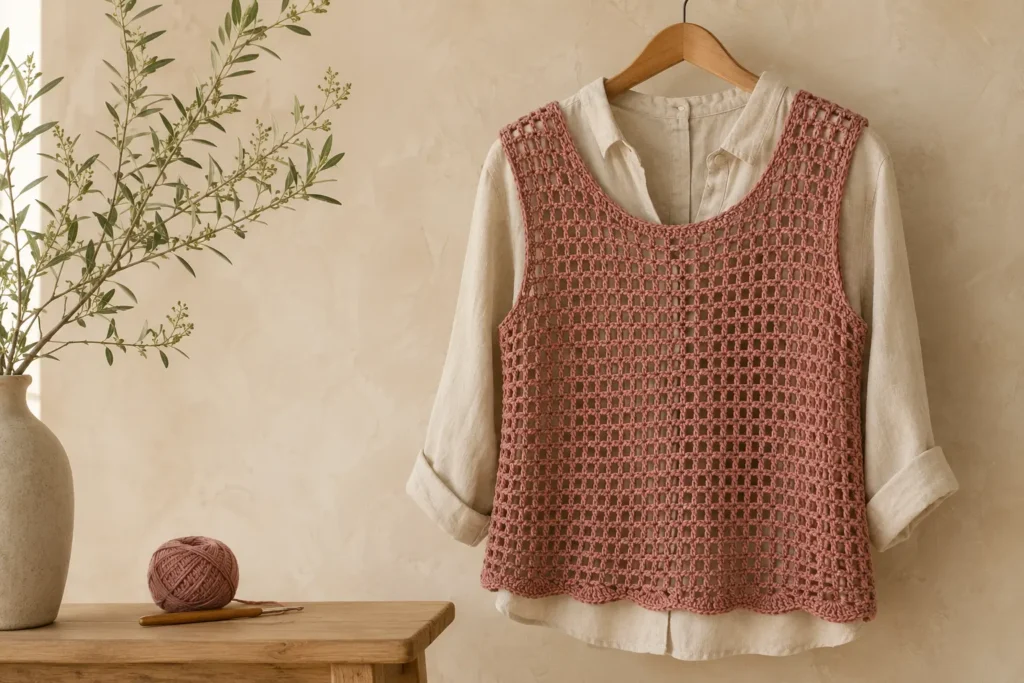
Crochet Mesh Layering: The 2026 Fashion Trend You Can Make at Home
Last updated: July 2026
If you’ve been scrolling through fashion feeds lately, you’ve noticed it everywhere — crochet mesh layering has officially taken over 2026 street style, runway shows, and even workwear. Unlike the boho crochet trends of previous years, this movement is all about structured transparency, layering crocheted mesh pieces over tailored clothing for a look that’s equal parts artisan and editorial.
The best part? You don’t need to spend $400 on a designer piece. With intermediate crochet skills and the right patterns, you can create stunning mesh layering pieces at home. In this guide, I’ll walk you through everything — from understanding the trend to choosing yarn, mastering the stitches, and styling your finished pieces.
Table of Contents
- What Is Crochet Mesh Layering?
- Why It’s Dominating 2026 Fashion
- 5 Key Mesh Layering Pieces to Crochet
- The Ultimate Yarn Guide for Mesh Projects
- Essential Stitch Techniques for Modern Mesh
- Pattern Breakdown: The Mesh Vest Overlay
- Pattern Breakdown: The Long Mesh Duster
- Pattern Breakdown: The Mesh Sleeve Shrug
- How to Style Crochet Mesh for Different Occasions
- Care and Maintenance Guide
- Common Mistakes to Avoid
- FAQ
What Is Crochet Mesh Layering?
Crochet mesh layering is the practice of wearing open-weave, net-like crocheted garments over other clothing to add texture, dimension, and visual interest to an outfit. Think of it as the crochet equivalent of wearing a sheer blouse over a camisole — except with far more craftsmanship and personality.
What sets 2026’s version apart from past crochet trends:
- Intentional structure: These aren’t floppy, shapeless pieces. They hold their form with strategic stitch placement and yarn choice.
- Neutral and monochromatic palettes: While colorful crochet still has its place, the mesh layering trend leans heavily into stone, cream, black, charcoal, and olive tones.
- Oversized-meets-fitted silhouettes: The mesh layer is often slightly oversized, worn over something more fitted underneath.
- Year-round wearability: Unlike heavy crochet blanket cardigans, mesh pieces are lightweight enough for summer yet add enough visual weight for cooler months.
Why Mesh Layering Is Dominating 2026 Fashion
Several cultural and fashion forces have converged to push crochet mesh layering to the forefront this year:
1. The “Handmade Luxury” Movement
Consumers in 2026 are increasingly rejecting fast fashion in favor of pieces with visible craftsmanship. Crochet mesh — with its clearly handmade texture — signals intentionality and skill. Major fashion houses like Bottega Veneta, Loewe, and Stella McCartney have all featured crochet mesh in their 2026 collections, further legitimizing handcraft in high fashion.
2. The Sheer/Transparency Trend Evolution
The sheer fabric trend that dominated 2024-2025 has naturally evolved. People want the layered, see-through aesthetic but are looking for more texture and dimension than plain organza or tulle can offer. Crochet mesh provides that perfectly — it’s transparent but interesting.
3. Sustainability Consciousness
Making your own clothes has never been more culturally valued. With growing awareness of textile waste, the ability to say “I made this” carries genuine social currency. Crochet mesh pieces use relatively little yarn compared to solid garments, making them economical and resource-efficient.
4. Social Media Virality
The visual contrast of a structured mesh piece over a solid garment photographs beautifully. Content creators on TikTok, Instagram, and Pinterest have driven massive engagement with mesh layering tutorials and styling videos throughout early 2026.
5 Key Mesh Layering Pieces to Crochet
Not sure where to start? Here are the five most versatile and on-trend mesh layering garments for 2026:
1. The Mesh Vest Overlay
This sleeveless, hip-length vest is arguably the entry point for the trend. Worn over t-shirts, button-downs, or even dresses, it adds instant texture without overwhelming your look. It’s also the easiest piece on this list to crochet, making it perfect for your first mesh project.
- Skill level: Beginner to Intermediate
- Estimated yarn: 300-500 yards
- Time investment: 8-15 hours
2. The Long Mesh Duster
A knee-length or ankle-length open-front duster in mesh crochet is the statement piece of 2026. It moves beautifully, creates dramatic silhouettes, and works with everything from jeans and a tank top to a slip dress.
- Skill level: Intermediate
- Estimated yarn: 800-1200 yards
- Time investment: 25-40 hours
3. The Mesh Sleeve Shrug
This piece covers just the shoulders and arms, leaving the torso open. It’s essentially mesh sleeves connected by a back yoke. Incredibly cool over sleeveless tops and dresses, it adds visual interest to your arms and shoulders.
- Skill level: Intermediate
- Estimated yarn: 200-400 yards
- Time investment: 6-12 hours
4. The Mesh Polo Collar Top
A mesh crochet top with a defined polo or mock-neck collar brings a preppy, polished element to the trend. Worn over a fitted long-sleeve top or bralette, this piece bridges casual and smart-casual.
- Skill level: Intermediate to Advanced
- Estimated yarn: 400-600 yards
- Time investment: 15-25 hours
5. The Mesh Skirt Overlay
A midi or maxi mesh skirt worn over a solid slip skirt or shorts creates beautiful movement and texture on the lower half. This is less common than tops and vests, which means you’ll stand out.
- Skill level: Intermediate
- Estimated yarn: 500-800 yards
- Time investment: 15-25 hours
The Ultimate Yarn Guide for Mesh Projects
Yarn choice can make or break a mesh layering piece. The wrong yarn will make your garment look crafty rather than chic. Here’s what to look for:
Best Fiber Types for Mesh
| Fiber | Pros | Cons | Best For |
|---|---|---|---|
| Mercerized Cotton | Beautiful sheen, excellent stitch definition, machine washable | Can be stiff at first, limited stretch | Vests, tops, skirts |
| Linen | Gorgeous drape after washing, gets softer over time, breathable | Expensive, can be rough initially, harder on hands | Dusters, statement pieces |
| Linen-Cotton Blend | Best of both worlds — drape + definition | Moderate price point | All mesh pieces |
| Bamboo | Silky feel, great drape, sustainable | Can be slippery to work with, stretches over time | Shrugs, lightweight layers |
| Tencel/Lyocell | Luxurious drape, eco-friendly, beautiful sheen | Limited availability, can split | High-end pieces |
Yarn Weights to Use
For modern mesh layering, stick with fingering weight (size 1) through DK weight (size 3). Anything heavier will look bulky and lose the delicate, fashion-forward aesthetic. Here are specific recommendations:
- For fine, delicate mesh: Fingering weight with a 3.5mm-4mm hook (larger than typically recommended for the yarn — this creates the open mesh effect)
- For moderate, everyday mesh: Sport weight with a 4.5mm-5mm hook
- For bolder, more visible mesh: DK weight with a 5.5mm-6mm hook
Recommended Yarns (Specific Brands)
- KnitPicks CotLin — An affordable linen-cotton blend that works beautifully for mesh. Great color range.
- Drops Safran — Egyptian cotton, lovely stitch definition, budget-friendly.
- Quince & Co. Sparrow — Organic linen, higher end but absolutely stunning for dusters and statement pieces.
- Hobbii Friends Cotton Silk — Adds a subtle sheen that elevates mesh pieces.
- Lion Brand Truboo — Bamboo viscose, excellent for beginners, very smooth.
Colors for 2026
Stay in the current palette for maximum impact:
- Stone / Warm Beige
- Bone / Off-White
- Charcoal (not pure black)
- Olive / Sage
- Espresso Brown
- Dusty Rose (the one “color” that works beautifully in mesh)
- Pure White (for summer pieces)
Essential Stitch Techniques for Modern Mesh
The magic of mesh crochet lies in using chain spaces and tall stitches to create open, geometric patterns. Here are the key techniques you’ll need:
1. Basic Chain Mesh (Foundation)
The simplest mesh pattern, and the one you’ll use most:
Row 1: Dc in 6th ch from hook, *ch 2, skip 2, dc in next ch* repeat across.
Row 2: Ch 5 (counts as dc + ch 2), turn, dc in next dc, *ch 2, dc in next dc* repeat across.
This creates a classic diamond grid pattern. Adjusting the number of chains between double crochets changes the openness of your mesh.
2. Solomon’s Knot (Lover’s Knot)
This is the showstopper stitch for 2026 mesh layering. It creates an organic, slightly irregular web-like fabric that looks incredibly high-end.
Draw up a long loop (about 1 inch), yarn over and pull through,
insert hook under the back strand of the long loop,
yarn over, pull through, yarn over, pull through both loops (creates a knot).
Make another long loop and knot, then sc into the center of a knot two rows below.
Solomon’s Knot takes practice but produces absolutely stunning mesh fabric. It’s especially beautiful in linen yarn.
3. Filet Crochet Mesh
A structured grid pattern that allows you to incorporate subtle geometric designs into your mesh:
Open mesh: Dc, ch 2, skip 2, dc
Closed mesh: 3 dc (fills in the space)
By alternating open and closed mesh, you can create stripes, checkerboard patterns, or even more complex geometric motifs within your garment.
4. Treble Crochet Mesh
For larger, more dramatic openings:
Row 1: Tr in 8th ch from hook, *ch 3, skip 3, tr in next ch* repeat.
Row 2: Ch 7 (counts as tr + ch 3), turn, tr in next tr, *ch 3, tr in next tr* repeat.
5. Offset Mesh
Instead of stacking your mesh squares directly on top of each other, you offset them by working into the chain spaces of the previous row. This creates a brick-like pattern that has more visual movement and drapes differently.
Pattern Breakdown: The Mesh Vest Overlay
Let’s break down the construction of the most beginner-friendly mesh layering piece. This is a conceptual pattern framework — you’ll want to swatch and adjust for your measurements.
Materials
- 350-500 yards of DK weight cotton or linen-blend yarn
- 5mm crochet hook
- Tapestry needle
- Measuring tape
Construction Method
The vest is worked in two flat panels (front and back), then seamed at the shoulders and sides.
Back Panel:
- Chain a foundation that matches your desired width (measure across your back from side seam to side seam, then add 2-4 inches for the relaxed fit).
- Work in basic chain mesh (dc, ch 2, skip 2) until the panel reaches from your hip to your shoulder.
- Shape the armholes by decreasing 2-3 mesh squares on each side over 3-4 rows, approximately 8-9 inches before the top.
- Continue straight until you reach shoulder height.
Front Panels (make 2):
- Chain a foundation that’s approximately half the width of the back panel minus 2 inches (for the center front opening).
- Work in basic chain mesh to match the back panel length.
- Shape armhole on the outer edge (same as back).
- Shape the neckline by decreasing 1 mesh square every other row on the inner edge for the last 3-4 inches.
Assembly:
- Seam shoulders using slip stitch or mattress stitch.
- Seam sides, leaving the armhole open.
- Optional: Add a single row of single crochet around all edges for a clean finish.
Pro Tips for the Vest
- Try it on frequently during construction. Mesh stretches, so err on the side of slightly smaller.
- Block aggressively. Soak the finished piece and pin it flat to dry. This opens up the mesh and evens out your stitches.
- For a more polished look, use a smaller hook for the edging than you used for the body.
Pattern Breakdown: The Long Mesh Duster
This is the piece that will get you the most compliments. It’s a larger project but incredibly rewarding.
Materials
- 900-1200 yards of sport weight linen or cotton-linen blend
- 4.5mm crochet hook
- Stitch markers
- Tapestry needle
Construction Method
The duster is worked in one piece from the top down, starting at the yoke. This minimizes seaming and allows you to try it on as you go.
Yoke (Top-Down Construction):
- Chain to fit around your neck plus 2 inches. Join to work in rounds.
- Place 4 markers to divide the round into: left front, left sleeve, back, right sleeve, right front.
- Work mesh pattern, increasing at each of the 4 markers every round (add one extra chain space at each marker point).
- Continue until the yoke reaches your underarm (approximately 8-10 inches of depth).
Separate Sleeves and Body:
- At the underarm, skip the sleeve stitches and chain across to bridge the gap.
- Continue working the body in mesh pattern (front-back-front) all in one piece.
- Work straight until the duster reaches your desired length (knee or ankle).
Sleeves (Optional):
You can leave the sleeves as-is from the yoke (creating a cap sleeve effect) or pick up stitches at the armhole and work short mesh sleeves down to the elbow.
Finishing:
- Work a border of sc or crab stitch along both front edges and the neckline.
- Block the entire piece — this is critical for the duster. Pin it to your desired length and width while wet.
Pattern Breakdown: The Mesh Sleeve Shrug
This unique piece is essentially a rectangle with a center seam for the back and two open ends for the arms.
Materials
- 250-400 yards of fingering or sport weight yarn
- 4mm crochet hook
- Tapestry needle
Construction Method
- Chain a foundation equal to your arm length (wrist to wrist, measured across your back with arms outstretched).
- Work in Solomon’s Knot or basic chain mesh for approximately 14-18 inches (this becomes the width of the shrug).
- Fold the rectangle in half lengthwise.
- Seam along each short end, leaving 8-10 inches open in the center for the neck opening.
- The long open edges become where your arms go through.
The result is a garment that sits on your shoulders and covers your arms with beautiful mesh, while leaving your torso visible. It’s surprisingly flattering and endlessly versatile.
How to Style Crochet Mesh for Different Occasions
Casual / Weekend
- Mesh vest + white t-shirt + wide-leg jeans + sneakers
- Mesh shrug + tank top + linen shorts + sandals
- Mesh duster (left open) + graphic tee + joggers
Smart Casual / Date Night
- Mesh polo collar top + fitted long-sleeve base + tailored trousers + loafers
- Mesh duster + slip dress + heeled mules
- Mesh vest + button-down shirt (tucked) + midi skirt
Beach / Resort
- Long mesh duster over swimsuit as a coverup
- Mesh skirt overlay over bike shorts
- Mesh vest over a bralette with linen pants
Work-Appropriate (Creative Workplaces)
- Neutral mesh vest over a crisp white shirt + dress pants — the mesh adds texture without being unprofessional
- Mesh shrug over a fitted dress — adds a creative layer that reads as intentional
Key Styling Rules
- Contrast the layers: If the mesh is loose, wear something fitted underneath (and vice versa).
- Tone-on-tone: The most sophisticated looks come from wearing mesh in the same color family as the piece underneath.
- Let the mesh be the statement: Keep jewelry and accessories minimal so the crochet texture is the focal point.
- Mind the undergarments: A nude seamless bralette or camisole under mesh looks polished. Contrasting undergarments look intentional and edgy. Just avoid regular bras with busy patterns — they’ll clash with the mesh grid.
Care and Maintenance Guide
Your beautiful mesh pieces deserve proper care to keep them looking fresh:
Washing
- Hand wash in cool water with a gentle detergent (Soak or Eucalan are excellent).
- If you must machine wash, use a mesh laundry bag (ironic, I know) on the delicate cycle.
- Never wring mesh crochet. Gently squeeze out excess water.
Drying
- Always lay flat to dry. Hanging mesh while wet will stretch it out dramatically.
- Reshape while damp — this is essentially re-blocking your garment after every wash.
- Pin into shape on a blocking mat for best results.
Storage
- Fold, don’t hang. Hanging mesh on a hanger will distort the shoulders and create stretching.
- Store in a breathable cotton bag or drawer, not plastic.
- Add a cedar block or lavender sachet to keep moths away (natural fibers are moth magnets).
Dealing with Snags
Mesh crochet is more snag-prone than solid crochet. If a loop gets pulled:
- Don’t cut it!
- Use a blunt tapestry needle to gently work the excess yarn back into the surrounding stitches.
- For small snags, simply pulling the fabric gently in all directions often redistributes the yarn.
Common Mistakes to Avoid
- Using acrylic yarn: Acrylic doesn’t drape well for mesh. It’s too springy and will make your garment look stiff and crafty rather than fashionable. Save acrylic for blankets and amigurumi.
- Making the mesh too tight: Use a hook at least 1-2 sizes larger than what your yarn label recommends. Mesh should be open and flowing.
- Skipping the blocking step: Unblocked mesh crochet looks messy and amateur. Blocking transforms it into something that looks designer. This step is non-negotiable.
- Choosing too-bright colors: A neon mesh vest will look like a costume. Stick with muted, sophisticated tones for wearability.
- Not accounting for stretch: Mesh stretches more than solid crochet, especially in plant-based fibers. Make your pieces slightly smaller than you think you need. They will relax into the right size.
- Over-accessorizing: Your mesh piece IS the accessory. Don’t compete with it.
- Ignoring gauge: “But it’s mesh, gauge doesn’t matter!” — Wrong. Gauge determines how open your mesh is, how much the garment drapes, and whether it fits. Always swatch.
Frequently Asked Questions
Is crochet mesh layering appropriate for all body types?
Absolutely. The key is choosing what goes underneath the mesh. The mesh layer itself adds texture and visual interest without clinging. Larger mesh patterns create a more relaxed silhouette, while finer mesh looks more structured. Choose what makes you feel confident — there are no body-type rules.
Can I use these pieces in cooler weather?
Yes! In autumn and winter, layer a mesh vest over a chunky turtleneck, or wear a mesh duster over a long-sleeve fitted dress with boots. The contrast between the warm base layers and the open mesh creates a gorgeous textural outfit.
How long does it take to make a mesh garment?
Because mesh uses chain spaces and fewer stitches per row than solid fabric, mesh garments actually work up much faster than solid crochet garments. A vest can be completed in a weekend of dedicated crocheting. A duster might take 1-2 weeks of evening crafting.
Can beginners attempt mesh layering pieces?
If you can chain, double crochet, and count stitches, you can make a basic mesh vest. Start with the vest, build your confidence, then work up to the duster. The Solomon’s Knot shrug is the most technically challenging but still achievable for an ambitious beginner.
Will the mesh unravel if I make a mistake?
Crochet doesn’t unravel the way knitting does. If you drop a stitch or need to fix an error, you can frog (rip out) back to the mistake without worrying about dropped stitches cascading down.
What hook material is best for mesh with plant fibers?
Metal hooks (aluminum or steel) work best with cotton and linen because they’re smooth and allow the yarn to glide easily. Bamboo or wood hooks can create too much friction with plant fibers, slowing you down and potentially splitting the yarn.
Final Thoughts
Crochet mesh layering is one of those rare trends that perfectly aligns what’s fashionable with what’s achievable for makers. You don’t need years of experience or expensive equipment — just some quality yarn, a hook, and the willingness to try something new.
The beauty of making your own mesh pieces is that they’re truly one of a kind. Even following the same pattern, your tension, yarn choice, and color selection will create something uniquely yours. In a world of mass-produced fashion, that’s incredibly powerful.
Start with the vest. Wear it proudly. Watch people ask where you got it. Tell them you made it. Then make the duster. 😊
Happy hooking!
Have you tried making a crochet mesh layering piece? I’d love to see your creations! Tag me on social media or drop a comment below with your progress.