How to Change Colors in Crochet Seamlessly
Learn the simple final-pull-through technique for clean crochet color changes, plus invisible joins, the Russian join, tension tips, and quick fixes.
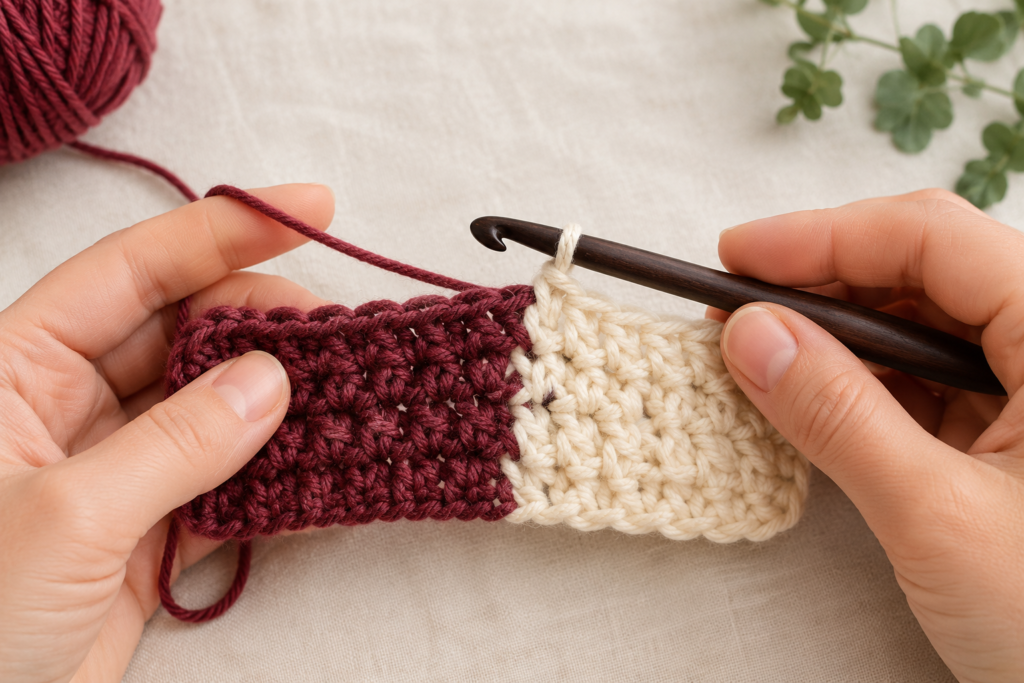
A clean color change can make a crochet project look polished and intentional. The secret is simple: introduce the new color during the final pull-through of the last stitch made in the old color.
This guide explains that technique for single crochet and double crochet, then covers the Russian join, invisible joins, managing several colors, and fixing common mistakes.
Why crochet color changes go wrong
Most untidy color changes come from one of four common problems.
1. Finishing in the old color
The final yarn-over and pull-through creates the top loops of a stitch. If you complete it in Color A, that color remains visible beneath the first stitch in Color B.
2. Loose transition tension
Picking up a new strand can loosen the loops on the hook, leaving a gap or one visibly larger stitch at the change point.
3. Bulky knots
Knots create bumps, can move toward the front of the fabric, and may loosen over time. Secure yarn tails by weaving them through the fabric instead.
4. Short or unsecured ends
A color change may look neat at first but unravel after washing if the yarn tails are too short or woven in only one direction.
The golden rule
Do not fully complete the last stitch in the old color. Use the new color for the final pull-through.
This rule works for single crochet, half double crochet, double crochet, and taller stitches. The number of loops changes, but the new color always completes the final pull-through.
Seamless color change in single crochet
What you need
- Yarn in Color A
- Yarn in Color B
- A suitable crochet hook
- Scissors
- A yarn needle
-
Work to the final stitch
Crochet normally in Color A until you reach the last stitch that should use that color.
-
Start the stitch in Color A
Insert the hook, yarn over with Color A, and pull up a loop. You should have two loops on the hook. Stop before completing the stitch.
-
Complete the stitch with Color B
Drop Color A. Leave a tail of about 6 inches in Color B, yarn over with Color B, and pull it through both loops.
The top of the stitch should now show Color B cleanly.
-
Continue in Color B
Work the next stitches normally. Keep the new strand secure without pulling so tightly that the edge puckers.
-
Secure the yarn tails
On the wrong side, weave each tail under four or five stitches. Reverse direction and weave through another four or five stitches before trimming.
Seamless color change in double crochet
-
Begin the last double crochet
Yarn over with Color A, insert the hook, yarn over, and pull up a loop. Yarn over again and pull through the first two loops. Two loops should remain.
-
Finish with Color B
Drop Color A. Yarn over with Color B and pull through both remaining loops.
-
Continue and finish
Keep crocheting in Color B, then weave the ends back and forth on the wrong side.
The Russian join
The Russian join connects two yarns without a knot and leaves almost no ends to weave in. It works best with plied yarn that is thick enough to hide the join.
-
Make a loop in Color A
Thread Color A onto a yarn needle and fold the end back to form a loop about 3 inches long.
-
Weave through the yarn plies
Pass the needle through the center of the yarn strand several times so the yarn locks into itself.
-
Add Color B
Before tightening the first loop, pass Color B through it.
-
Secure Color B
Fold Color B back and weave its end through its own plies in the same way.
-
Tighten the join
Pull gently on both strands until the two loops close and interlock. Trim only the tiny loose fibers.
The invisible join for finished rounds
An invisible join creates a false top loop that makes the end of a round resemble an ordinary stitch.
-
Cut the yarn
After the last stitch, cut the yarn with a 6-inch tail and pull the tail through. Do not make a slip stitch.
-
Thread the yarn needle
Place the tail on your yarn needle.
-
Pass under the first stitch
Insert the needle from front to back under both top loops of the first stitch in the round.
-
Return through the final stitch
Insert the needle from top to bottom through the back loop of the last stitch.
-
Adjust and secure
Pull gently until the false stitch matches its neighbors, then weave the tail into the wrong side.
Managing several colors
Carry yarn up the edge for short stripes
If a stripe color returns within four rows, carry it loosely up the side instead of cutting it. Twist the resting strand with the working yarn at the row edge so it stays tidy.
Crochet over tails when appropriate
Lay a yarn tail along the top of the row and work six to eight stitches over it. For slippery fibers or items that will be washed frequently, finish by weaving the remaining tail back in the opposite direction.
Use bobbins for intarsia
For large blocks of color within the same row, wind small amounts of each color onto bobbins. This keeps separate yarn supplies organized and prevents tangling.
Check color placement in good light
Bright, neutral light makes it easier to see stitch placement, yarn tails, and accidental color carry-through before the mistake grows.
Color-change methods compared
| Method | Best for | Level | Ends |
|---|---|---|---|
| Final pull-through | Most stitches and yarns | Beginner | Yes |
| Russian join | Plied, medium-to-thick yarn | Intermediate | Minimal |
| Invisible join | Closing finished rounds | Intermediate | Yes |
| Carry up the side | Short repeating stripes | Beginner | Minimal |
| Intarsia bobbins | Large color blocks | Advanced | Yes |
Common mistakes and quick fixes
The old color peeks through
Cause: The final stitch was completed in Color A.
Fix: Undo that stitch and use Color B for its final pull-through.
The transition stitch is loose
Cause: Tension changed while picking up the new yarn.
Fix: Gently adjust both yarn tails, then work the first few new stitches slowly.
A knot shows on the surface
Cause: The yarn was tied instead of woven in.
Fix: Move the knot to the wrong side if possible and secure the tails with a yarn needle.
An end loosened after washing
Cause: The tail was too short or woven in only one direction.
Fix: Reweave any remaining tail and reverse direction to create a secure lock.
A simple tension habit
After changing colors, work the first three stitches slowly. This gives your hands time to settle into the new strand and helps the transition match the tension of the surrounding fabric.
Final checklist
- Switch colors during the final pull-through.
- Leave tails long enough to secure.
- Keep the first new stitches even, not tight.
- Weave tails in two directions.
- Use an invisible join when finishing a round.
- Check the right and wrong sides before trimming.
Once the final-pull-through rule becomes automatic, clean color changes stop feeling like an advanced technique. Practice it on a small swatch first, then use it confidently in stripes, granny squares, blankets, garments, and colorwork projects.