Blocking 101: The Final Step That Transforms Your Crochet
Learn how to block crochet with complete wet, steam, and spray-blocking instructions, fiber guidance, troubleshooting, and professional finishing tips.
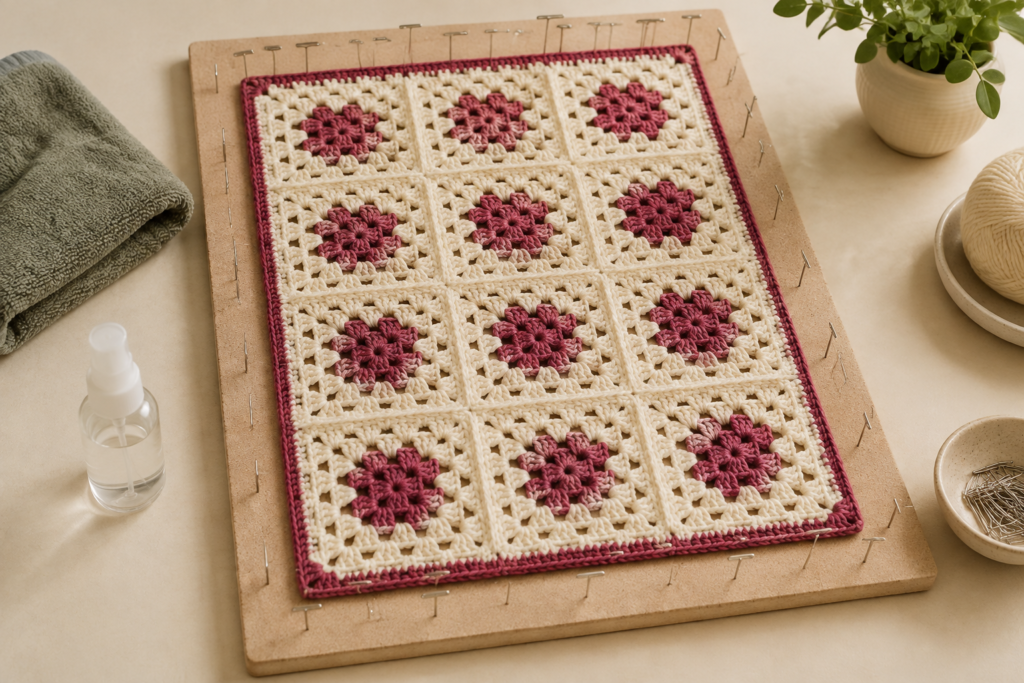
You have just finished crocheting a beautiful piece. The stitches look good, the colour changes are seamless, and you have woven in every single end with a needle. You are done, right?
Not quite.
If you want your finished piece to look truly professional — with clean edges, even stitches, open lacework that actually shows its pattern, and the correct final dimensions — there is one more step that most beginners skip entirely.
It is called blocking. And it is the single step that separates a piece that looks homemade from one that looks like it came from a high-end boutique. At Crochelly, it is a step we never skip — not for a single item, not under any circumstances.
This guide covers everything: what blocking is, why it matters, which method works for which project, and the exact process we use on every piece before it leaves our studio.
🧺 What This Guide Covers
What Blocking Actually Is
Blocking is the process of wetting, reshaping, and drying your finished crochet piece to its correct final dimensions. It uses water — or steam — to relax the yarn fibres, and then gentle tension to hold the piece in the correct shape while it dries.
It works because yarn fibres — especially natural ones like wool, alpaca, cotton, and linen — are flexible and responsive to moisture. When you wet the yarn and reshape it while it is damp, the fibres relax into their new position and dry there permanently.
The result is a piece with a level of finish that is simply not achievable straight off the hook.
Blocking is not a trick. It is not a shortcut. It is the final stage of the making process — the step that completes the work you already did and allows it to reach its full potential.
Before and After: What Blocking Actually Does
The transformation blocking creates is dramatic enough that most people who see it for the first time do not believe it is the same piece. Here is exactly what changes:
Before Blocking
Fresh Off the Hook
- Edges curling inward or outward
- Uneven stitch sizes throughout
- Lace holes closed and indistinct
- Smaller than the pattern dimensions
- Seams that pucker or pull
- Decorative points flat and undefined
- Granny squares that will not lie flat
- Overall appearance of looking handmade
After Blocking
Fully Finished Piece
- Flat, straight, professional edges
- Completely even stitch appearance
- Open lacework fully revealed
- Correct pattern dimensions achieved
- Seams lying completely flat
- Decorative points sharp and defined
- Squares perfectly flat and joinable
- Boutique-quality finished appearance
The Lace Shawl Test
The most dramatic demonstration of blocking is a lace shawl. Fresh off the hook, even a beautiful lace shawl looks like a crumpled piece of fabric with barely visible holes. After blocking, those same holes open fully into the delicate floral or geometric pattern the designer intended. The piece can grow by 30 to 40 percent in size. It is genuinely a transformation — not an exaggeration.
Does Your Project Need Blocking?
Not every crochet project benefits equally from blocking — but most benefit more than you would expect. Here is a practical guide to help you decide:
| Project Type | Blocking Needed? | Priority Level | Primary Reason |
|---|---|---|---|
| Lace Shawls & Wraps | Yes — absolutely essential | 🔴 Critical | Lace does not look like lace until it is blocked open |
| Garments (Sweaters, Cardigans) | Yes — always | 🔴 Critical | Ensures correct fit and flat seams |
| Granny Squares & Motifs | Yes — before joining | 🔴 Critical | All pieces must be identical size to join cleanly |
| Blankets & Throws | Yes — recommended | 🟡 Recommended | Evens out stitches and straightens edges |
| Scarves & Cowls | Yes — recommended | 🟡 Recommended | Eliminates curling edges, improves drape |
| Hats & Beanies | Sometimes | 🟢 Optional | Useful for shaping but not always necessary |
| Bags & Totes | Rarely | 🟢 Optional | Structure pieces rarely need reshaping |
| Amigurumi & Stuffed Items | No | ⚪ Not Needed | 3D structure is maintained by stuffing |
The Three Methods of Blocking
Different fibres and different projects call for different blocking methods. Using the wrong method on the wrong fibre can damage your work permanently, so it is important to match the method to the material.
Method 1: Wet Blocking
Wet blocking fully saturates the yarn fibres with water, allowing the most dramatic reshaping. It is the most thorough method and produces the most significant transformation — particularly for natural fibres like wool, alpaca, cotton, bamboo, and linen.
Prepare the Soak
Fill a clean basin or your sink with lukewarm — not hot — water. Add a small amount of gentle wool wash or no-rinse fibre rinse if you have it. Products like Eucalan or Soak condition the fibres as they block, leaving the finished piece feeling softer.
Submerge the Piece
Gently press your finished piece into the water. Do not agitate, scrub, or wring — these actions can felt wool and distort other fibres. Simply press it down and allow it to soak for a minimum of 15 to 20 minutes until fully saturated.
Remove Carefully
Lift the piece out of the water supporting its full weight from underneath — never pick it up from one corner. Wet yarn is extremely heavy and the weight can permanently stretch the fibres if the piece hangs unsupported.
Remove Excess Water
Lay the piece flat on a clean dry towel. Roll the towel around the piece like a log, then press down firmly along the roll to transfer the excess water from the yarn to the towel. Unroll and transfer the piece to your blocking mat. Do not twist the roll.
Pin to the Blocking Mat
Lay your piece on the blocking mat and begin shaping it to the correct dimensions. Use your pattern’s schematic measurements as your guide — measure frequently with a tape measure. Insert rust-proof T-pins at regular intervals along the edges to hold the shape. For lace, pull any decorative points out firmly before pinning.
Allow to Dry Completely
Leave the piece pinned on the blocking mat until it is completely dry throughout — not just on the surface. Drying time varies from 12 hours for fine yarns to 48 hours for bulky weights. Pointing a fan at the piece speeds drying significantly without causing damage.
Remove Pins and Admire
Once fully dry, remove pins starting from the centre and working outward. Your piece will hold its blocked shape permanently — until its next wash, after which it should be re-blocked using the same process.
Method 2: Steam Blocking
Steam blocking uses heat and moisture together to relax yarn fibres. It is faster than wet blocking and particularly effective on wool and wool blend yarns. However, it requires more care — direct heat can permanently damage or flatten certain fibres if applied incorrectly.
Pin the Piece Dry First
Unlike wet blocking, with steam you pin your piece to the mat before applying any moisture. Shape it to the correct dimensions and pin securely — the steam will set the shape you create here.
Prepare Your Steam Source
A handheld garment steamer gives the most control and is the safest option. Alternatively, use a steam iron set to the appropriate heat for your fibre type — but never lower the iron onto the fabric surface.
Apply Steam at a Distance
Hold your steam iron or steamer 2 to 3 inches above the surface of your pinned piece. Move it slowly and evenly across the fabric, applying a gentle, consistent layer of steam. Do not hover in one spot.
Press Gently if Needed
For areas that need additional flattening — like seams or particularly stubborn edges — place a damp pressing cloth over the section and press briefly with the iron on top of the cloth. Never iron directly onto yarn.
Allow to Cool Completely
The piece needs to cool and dry fully before you remove the pins. Steam-blocked pieces set as they cool, so rushing this step will undo the work. Allow at least 30 to 60 minutes before touching the pins.
Method 3: Spray Blocking
Spray blocking is the quickest and gentlest method. It works well for pieces that need minor adjustment rather than aggressive reshaping — or for natural fibres that respond well to light moisture. It will not produce the same dramatic transformation as wet blocking, but for small corrections it is fast and effective.
Pin the Piece First
As with steam blocking, pin your piece to the blocking mat in the desired shape before applying any moisture. Shape it to the correct measurements and pin securely at regular intervals.
Mist Evenly
Using a clean spray bottle filled with cool water, mist the entire surface of the piece evenly. You want the yarn to be damp throughout — not soaking wet, but genuinely moist. Work in sections if needed for larger pieces.
Pat and Adjust
Gently pat the surface to encourage the moisture to absorb evenly into the fibres. Adjust any pins as needed while the yarn is still damp and pliable.
Allow to Dry Fully
Leave pinned and flat until completely dry. Because less water was used, drying time is typically shorter than wet blocking — usually 8 to 16 hours depending on yarn weight and room humidity.
Which Method Should You Choose?
| Fibre Type | Best Method | Avoid | Notes |
|---|---|---|---|
| Wool / Merino | Wet or Steam | Hot water, agitation | Will felt if subjected to heat and friction together |
| Alpaca | Wet or Spray | High heat steam | Gentle handling — can stretch permanently under its own weight when wet |
| Cotton | Wet | Nothing specific | Responds beautifully to wet blocking. Can handle warmer water than wool. |
| Bamboo / Linen | Wet | Nothing specific | Both fibres are very responsive to wet blocking and transform dramatically |
| Acrylic | Steam (carefully) | Wet blocking alone | Use the “killing” technique with steam. See the acrylic section below. |
| Mohair / Halo Fibres | Spray only | Direct steam or heat | Heat flattens the halo permanently. Use only the gentlest moisture. |
| Blended Yarns | Follow dominant fibre | Depends on blend | A 70% wool, 30% alpaca blend should follow wool guidelines. |
Your Blocking Shopping List
You do not need much equipment to block well — but the right tools make a significant difference to both the process and the result. Here is everything we use in the Crochelly studio:
Interlocking Blocking Mats
Essential
Foam interlocking mats — similar to children’s play mats — are the standard blocking surface. Get enough to cover the full size of your largest project. Pins go in easily and they can be wiped clean.
Rust-Proof T-Pins
Essential
Non-negotiable. Standard pins will rust and permanently stain your yarn. Buy a pack of at least 100 rust-proof T-pins or stainless steel blocking pins. You will use more than you expect.
Measuring Tape
Essential
A flexible tape measure to compare your blocked dimensions against the pattern schematic. Measure both width and length at multiple points to ensure even shaping throughout.
A Clean Basin
Essential
Large enough to fully submerge your finished piece without folding or bunching. For larger blankets, a clean bathtub works perfectly.
No-Rinse Fibre Wash
Optional
Products like Eucalan or Soak are added to the blocking water. They clean and condition the fibres simultaneously, leaving the finished piece noticeably softer and with a gentle fresh scent.
Blocking Wires
Optional
Long flexible stainless steel wires threaded through the edge of your piece before pinning. They create perfectly straight edges with far fewer pins — essential for shawls and recommended for blankets.
Handheld Garment Steamer
Optional
Far more controllable than a steam iron for steam blocking. Heats up quickly, is easy to direct precisely, and eliminates the risk of accidentally touching the iron to the yarn surface.
A Small Fan
Optional
Directing a fan at your wet-blocked piece dramatically reduces drying time without causing any damage. Particularly useful for bulky pieces that would otherwise take 48 hours to dry.
How to Block Different Project Types
The general blocking process is the same for every project — but the specific pinning approach changes depending on what you are blocking. Here are detailed instructions for the most common project types:
Blocking a Lace Shawl or Wrap
Intermediate
Shawls benefit more from blocking than almost any other project type. The transformation from crumpled fabric to open, delicate lace is the most dramatic demonstration of what blocking achieves. Never wear a lace shawl without blocking it first.
- Wet block using Method 1. Fully saturate and press out excess water in a towel.
- Lay flat on your blocking mat and find the centre point of the top edge. Pin this first to establish the orientation.
- Pin the two outermost front corners symmetrically — measure from the centre pin to ensure they are equal on both sides.
- Pin the top edge straight and even between these three anchor points, using blocking wires if available.
- Work your way around the bottom edge, pulling any lace points or scallops firmly outward before pinning each one. These decorative points are what make a lace shawl look finished.
- Step back and check the overall shape — it should be symmetric and the lace pattern should be evenly open throughout.
- Allow to dry completely — at least 24 hours for most shawl weights.
Blocking a Sweater or Cardigan
Intermediate
Blocking a garment is what ensures it actually fits correctly and that all the work of seaming comes together cleanly. Block each piece to the schematic measurements before seaming wherever possible — it is far easier than trying to block a finished garment.
- Block each piece — front body, back body, sleeves — separately before joining seams.
- Use the schematic included in your pattern as your blocking guide. Measure and pin to each dimension listed — width at the underarm, width at the hem, sleeve length, body length, and so on.
- Pay particular attention to the neckline — pin it to the correct shape and depth so it lies flat when worn.
- Once all pieces are dry, seam using your chosen method.
- Lightly steam block all seams flat — this is a significant part of what gives a handmade garment a professional finish.
- If needed, do a final light wet block of the finished garment to bring everything together.
Blocking Granny Squares and Motifs
Beginner
Blocking granny squares before joining them is perhaps the most important use of blocking in crochet. If your squares are not all exactly the same size and completely flat, your finished blanket will pucker, pull, and never lie flat — no matter how carefully you join them.
- Create a blocking template: draw your desired square size on paper and slip it under your blocking mat as a guide.
- Wet block each square using Method 1.
- Place each wet square over the template and pin all four corners to the exact same measurements — use the template to ensure every single square is identical.
- Pin the midpoint of each side as well to keep the edges straight.
- Allow to dry completely before removing pins.
- Block all squares in batches so they are all ready to join at the same time.
- Join the uniformly blocked squares — they will come together cleanly and lie completely flat.
Blocking a Blanket or Throw
Beginner
Large blankets present a size challenge — you need enough blocking mat surface to lay the piece flat. Join multiple mats or use a clean carpeted floor covered with clean towels as your blocking surface for very large pieces.
- For very large blankets, wet blocking in the bathtub is the most practical approach. Fill the tub, submerge fully, and drain before lifting the piece out.
- Use multiple towels to press out excess water — blankets hold a significant amount of water.
- Lay flat on your largest available blocking surface.
- Use blocking wires along all four edges — this makes pinning a large blanket dramatically faster and the result significantly straighter.
- Measure and pin to the correct dimensions. Use a long straight ruler or yardstick to check that edges are truly straight.
- Allow 36 to 48 hours minimum for a bulky blanket to dry completely throughout.
A Special Note on Blocking Acrylic Yarn
Can You Block Acrylic? Yes — But Differently
Acrylic yarn does not respond to wet blocking the way natural fibres do. Running water over acrylic and letting it dry will not significantly change the shape or appearance of the fabric. However, acrylic can be permanently transformed using a technique called “killing” the acrylic — using steam heat to permanently relax and soften the synthetic fibres.
When done correctly, “killing” acrylic produces a fabric that is noticeably softer, has better drape, lies flatter, and loses the slight plasticky stiffness that some acrylic yarns have when first crocheted.
How to Kill Acrylic — Step by Step:
- Pin your finished piece to the blocking mat in the desired shape before applying any steam.
- Fill your steam iron to capacity with water and set it to the steam setting appropriate for synthetics — usually medium heat.
- Hold the iron 1 to 2 inches above the fabric surface and apply steam evenly across the entire piece. Do not let the iron touch the yarn.
- Immediately after steaming a section, press down firmly with a clean damp cloth or your hand (carefully — the steam is hot). You will feel the fabric soften and flatten under the pressure.
- Work systematically across the entire piece until every section has been steamed and pressed.
- Allow to cool completely — at least 30 minutes — before removing any pins.
- The change will be immediately noticeable: softer, flatter, and with improved drape.
Troubleshooting Common Blocking Problems
Even with careful technique, problems occasionally arise. Here is how to identify and solve the most common blocking issues:
The Piece Is Still Curling After It Dried
Likely Cause: The piece was not wet enough before pinning, or not enough pins were used to hold the edges flat.
The Piece Dried Larger Than the Pattern Dimensions
Likely Cause: The piece was stretched too aggressively while pinning, beyond the measurements called for in the pattern schematic.
The Fibres Feel Stiff or Scratchy After Blocking
Likely Cause: Hard water mineral deposits left in the fibre after blocking. This is common in areas with high water hardness.
Pin Marks Are Visible After Drying
Likely Cause: Pins were placed too far apart, concentrating the tension at single points and creating visible indentations.
The Piece Lost Its Blocked Shape After the First Wash
Likely Cause: This is completely normal for natural fibres. Blocking is not permanent — it resets with every wash.
The Wool Has Felted During Blocking
Likely Cause: The water was too hot, or the piece was agitated — rubbed, wrung, or scrubbed — while wet. Heat plus friction causes wool to felt irreversibly.
The Crochelly Blocking Process
Every single item that leaves our studio goes through a complete, non-negotiable blocking process. Here is exactly what that looks like — step by step — for every piece we make:
Step 01
The Pre-Block Inspection
Before the piece enters the water, we inspect every single end. Every tail must be woven in with a needle and secured in both directions. We check all seams and colour changes under good light. Nothing gets blocked until every end is permanently secured — because blocking can occasionally loosen an insufficiently woven end.
Step 02
The Soak
The finished piece is submerged in cool water with a splash of no-rinse fibre wash for a minimum of 20 minutes. We press it under gently every few minutes to ensure complete saturation throughout — particularly for bulky pieces where the centre can remain dry.
Step 03
Pressing and Transferring
We lift the piece supporting its full weight, lay it on a clean white towel, and roll and press firmly to remove excess water. We use two towels for heavier pieces. We never wring, twist, or squeeze — the fibres are at their most vulnerable when saturated.
Step 04
Pinning to Dimensions
We use the exact measurements from our pattern schematic and pin systematically — centre points first, then corners, then working along each edge. Blocking wires are threaded along all straight edges before pinning. We measure at a minimum of six points across each piece to confirm even dimensions throughout.
Step 05
The Dry
Every piece dries for a minimum of 24 hours in a well-ventilated area with a fan directed at it. For bulky weights, we allow 48 hours. We do not remove pins to check whether the piece is dry — we wait the full time regardless.
Step 06
The Final Quality Inspection
Only after complete drying and pin removal do we conduct the final inspection — checking stitch consistency throughout, edge straightness, overall dimensions, and the appearance of every colour change and seam. A piece that does not pass this inspection is re-blocked before it is ever packaged.
Why We Never Skip This Step
Blocking adds time to every piece we make. For a large sweater or blanket, it adds an entire day to the production process. And it is invisible — you cannot see blocking from the outside. You can only see the result of it.
That is exactly why we never skip it.
Because the result — the flat edges, the even stitches, the correct dimensions, the professional finish — is the difference between something that looks handmade and something that looks crafted. And every piece that carries the Crochelly name is crafted.
The next time you pick up one of our pieces and notice that it lies perfectly flat, that the edges are straight, that every stitch looks exactly the same as the one next to it — you now know the step that made that possible.
Show Us Your Before and After
We love seeing blocking transformations. Share your before and after photos and tag us — we repost our favourites and would love to celebrate your finished pieces.
See the Result of This Process in Every Piece
Every item in the Crochelly collection has been blocked, inspected, and finished to the standard described in this guide. Browse the collection and see what that process looks like in the finished work.